Methods of Field Collecting Radioactive Minerals
The search for radioactive minerals is an exciting activity that requires special equipment and expertise.

Introduction
The typical tools of the exploration geologist or recreational rockhound are well known to most of us who, at some point, have ventured into the field with aspirations of collecting minerals. This assortment of tools usually includes a hand pick, shovel, hand lens, sledge hammer, chisels, a backpack, and a map. In the case of gold prospectors, the tool choices shift slightly to accommodate their specific needs. Where hammers and chisels are the go-to for hard rock miners, gold pans, classifier screens, and sluice boxes better suit the needs for the recovery of gold. Collecting radioactive minerals is no less a tailored task and requires its own specific tools and equipment for efficient results. However, unlike other popular collecting practices, most collectors find to be the most interesting aspect of radioactive minerals to be the way to find them. This of course being that they are inherently radioactive and therefore, are detectable by sensitive equipment. Geiger counters, or more appropriately, scintillation detectors, are the only truly necessary pieces of equipment for the collection of radioactive minerals. While other electronic tools utilize “active” detection methods (whereby a signal or force of some kind is emitted by the device; i.e., metal detectors, UV lights), scintillation detectors operate “passively” by waiting for a signal emitted from the mineral that the device can measure (i.e., seismometers, thermometers). The following discussion should serve as an introduction to the proper methods for the recovery of radioactive minerals and may be applied broadly. I highly recommend that the reader engages in some previous study regarding radioactive minerals and the safety precautions that should be taken with them.
Equipment Selection
It is important to understand the difference between a geiger counter and a scintillation detector (more commonly referred to simply as a scintillator). While the operational characteristics of both are different, the details of each will not be covered in this article. The most significant difference for the collector is that a scintillator instrument is far more sensitive than a geiger counter and is therefore the better tool for radioactive mineral collecting and prospecting. When selecting a suitable scintillator, I recommend that the reader most strongly consider cost at purchase. Other factors—such as brand or scintillating material—are important, but to the individual who is only interested in finding radioactive minerals, these factors may not be vital. Additional information can always be learned along the way for the interested collector. A typical scintillator setup consists of three main components: the probe, which contains the scintillation material (Thallium Doped Sodium Iodide (NaI(Tl)), Cesium Iodide (CsI), plastic or others), a coaxial cable with the proper adapters, and a meter that provides audio and visual feedback to the user. Finally, it is in your best interest to purchase a high quality, hard plastic carrying case for your equipment to protect it during transportation.

The best methods for acquiring a working scintillator is to either purchase one new from one of the many companies that still produce them or to scout second hand sales platforms such as Ebay or Facebook Marketplace. Almost all of my personal radiation detection equipment was purchased on these two platforms. The typical price range for a used scintillator with a meter is between 300 and 1000 USD. Factory new devices are typically much more expensive, usually ranging into the thousands of dollars.

Personally, I have not seen any good reason to purchase new equipment when there is a good variety of working used equipment available. The most common brand of radiation detection equipment is Ludlum Measurements, Inc. I highly recommend their products. A relatively new manufacturer for scintillation detection devices is RadiaCodetm. This company makes a very affordable all-in-one device that is excellent for prospecting (Radiacode versions 101, 102, 103) and can even handle some simple gamma spectroscopy that can be used to identify the particular radioactive isotope(s) in the mineral. Do not buy one of the old Civil Defense yellow geiger counters for prospecting minerals. Those particular devices are really only sensitive to the radioactive byproducts of nuclear detonations.
The new premium magazine for mineral collectors
4 issues per year – packed with fascinating finds, expert knowledge, and collector passion. The first bilingual magazine (German/English), including full online access.
Explore subscription
Methods at Home
Before ever going out into the field to collect minerals of any kind, you must start with the research phase. In my experience, a broad search of literature and scientific publications was always the first step to find minerals in nature. Individual publications on particular mining districts containing mine descriptions, identified mineral species, and mine maps are some of the most useful resources available. The research phase may, at times, appear daunting to those who are just beginning to prospect. However, modern databases like www.mindat.org and thediggings.com are excellent starting points for both amateurs and more experienced collectors. My personal method for researching new localities involves the use of around 10 different applications, programs, and websites. I typically read between two and five peer-reviewed journal publications pertaining to the mine in question, if they are available. Most radioactive minerals and rare earth element (REE) minerals form in a type of igneous rock called a pegmatite. Locating these types of rocks can narrow your search.
My first choice to see which mines are listed to have produced radioactive minerals as well as any previously compiled literature is always www.mindat.org. However, the mineral data for Mindat is not always up to date, and some of the more obscure minerals (like many radioactive minerals) are not listed for one reason or another. This is usually because the original mine report or supporting literature fails to mention it. This dilemma may be resolved in one of two ways. You may choose to either extrapolate from other mineralogical information or broaden/generalize your search. For example, if the mine you are looking at on Mindat lists pegmatite minerals such as quartz, feldspar group, mica group, and garnet group minerals and also lists allanite group, or monazite (common REE minerals), it could be hypothesized that there may be other REE minerals present such as uraninite or samarskite that were never properly identified. On the other hand, if Mindat or the literature make no mention of any REE minerals and only generic pegmatite minerals are listed for the mine (quartz, feldspar group, mica group, garnet group) it may be useful to expand your search to see what other mines in the vicinity or district report. You may also consider checking to see if those same mines have accessible tailings piles— these are always worth checking out if you are able.
The second step is to investigate the available literature on the mine or district you will be visiting. Literature sources often provide very helpful information that may not be given on more general databases like Mindat. Mindat is usually very good at listing the available literature. However, if this is not the case, geologic bulletins are a good start and usually lead you to more information. A general Google search is usually enough (i.e., “uranium deposits of the United States”). However, using a tailored search engine like Google Scholar may be better for finding informative and reliable results.


The must-have for everyone who collects minerals
Mineralica is your premium collector’s magazine – made exclusively for lovers of minerals and fossils. In print, bilingual, and with full access to the complete online library.
View issue previewFinally, confirm that the mine locality data is correct. This can be accomplished using either of the aforementioned websites in combination with an open source mapping software like Google Maps. By selecting “terrain” under the layers tab, you may be able to view the profile of the mine or the tailings piles (if they are large enough). There are other resources you may use to pinpoint the locations of the mines that may be easily found online with a few Google searches. Always make sure to be safe when approaching and exploring abandoned or active mines and be sure to follow the general rockhounding rules and etiquette. Always obtain the necessary permissions to collect and fill in any holes you may create. Sources like Mindat may not always mention if an area is private property or not. Ensuring that you have permission is your responsibility as a collector.
Methods in the Field
There are typically two approaches to collecting minerals on-site: recovery of in-situ material and recovery from tailings piles. There are several issues associated with recovery of in-situ material—primarily safety. It should also be noted that radioactive minerals are one of the least common minerals that are going to be present at the mine or locality. Therefore, collecting them may require a large effort to reach and subsequently extract the mineral from the host rock. This may not be worthwhile if it poses safety risks. In my experience, collecting efforts are far more productive in searching mine tailings. Not only is it easier and generally safer to access, the material is also spread out over a larger area. This increases the chances of encountering a radioactive mineral specimen.
When you’re ready to start looking for radioactive minerals, turn your scintillation device on and identify what the local background radiation is in units of counts per minute (CPM). This should be done as far away from the actual ground as possible for the most reliable results. I tend to hold the meter in one hand and the probe high above my head with the other. Once you are satisfied with what you feel is the average CPM for that particular area, you may begin searching. If your detection device operates using an audible clicking feedback, you will develop a sense for the typical interval between the individual clicks or counts. When approaching a radioactive mineral, you will notice a distinct increase in the rate of clicks that will continue to increase as you get closer to the mineral. When you are exceptionally close to recovering the mineral, it may become impossible to differentiate one click from another. Similarly, if your detection device has visual feedback, you will need to watch the needle or screen for any increases in CPM beyond the background for the area. In either case, adjusting the sensitivity of the meter may be beneficial, if the device allows it. Adjusting the sensitivity helps to reduce the “noise” from background radiation. Note, on the meters made by Ludlum, there is either a switch or a dial to adjust the sensitivity logarithmically.

The best way to maximize the potential for detecting radioactive minerals is to conduct a grid search. Very similar to how treasure hunters use a metal detector to sweep a beach or field for precious metals or artifacts, moving across a tailings pile in a grid pattern with your scintillator in hand will greatly increase your ability to detect radioactive minerals. Walking a straight line with the scintillator as close to the ground as possible up and down the tailings pile with each subsequent line being parallel to the last will quickly cover a lot of ground. Sweeping the scintillator back and forth across your path increases the area you can cover with each pass. Once an area of increased radiation is discovered, you should identify the epicenter of the radioactivity and dig down carefully or mark it using flags to revisit later.

Once you begin to dig into the ground, you should continuously check and recheck the hole with the scintillator to ensure you are chasing the mineral in the correct direction. Progressive increases in intensity will point you in the correct direction. It is best to scan the hole you have created in a front to back, side to side pattern. In the event that the hole no longer measures the same intensity, sweep the probe over the material you just removed from the hole in case you have already excavated the radiation source. If the mineral is large enough to be seen inside the hole but is not able to be pulled out, carefully dig around it with smaller hand tools and avoid prying, as most radioactive materials are brittle from their own radioactivity leading to a destruction of their crystallinity (called metamictization). On the other hand, if you are digging, and the radiation intensity is irregular or seems to change randomly, you may be experiencing what is referred to as ground effect. This is when small amounts of radioactive material is localized but irregularly dispersed leading to some confusing results. In these cases, I typically move on to the next spot. Once you have recovered the mineral, take the time to put it in a safe place. I tend to return to my vehicle or my backpack so that I reduce my overall exposure to higher levels of radiation. Also, when handled one at a time, the risk of damaging specimens by grinding may be reduced. If you are visiting multiple localities in a single day, be sure to keep the material from the individual mines separated so you can document them properly later.
Discover more fascinating stories like this?
Mineralica brings you the most fascinating finds, places, and people from the world of mineral collectors – in print and online. A must-have for every collector.
Subscribe now and never miss an issueCleaning and Storage
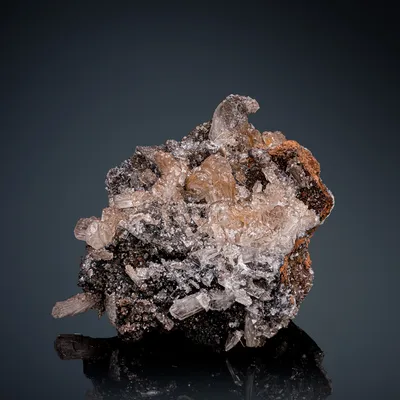
After you have successfully recovered your radioactive minerals, you will want to clean them to remove any excess dirt or debris before storing them in your collection. Carefully wash off the dirt using a soft toothbrush and a bucket filled with warm water and soap. In some cases where there may be more fragile secondary uranium minerals associated with the specimen, more care must be given to prevent damage. However, in most cases, minerals like allanite, samarskite, and uraninite are not as friable and may be cleaned more aggressively. The waste material and the water you use should be disposed of outside if possible. There is usually no radioactive material in the water or sediments, so it is safe to dispose of in a similar way to other dirty water. I don’t typically clean minerals in my sink at home to avoid sediment buildup in my pipes.


When storing radioactive minerals, it is unnecessary to enclose them in lead or other types of shielding materials. The radiation emitted from natural minerals is simply not high enough to warrant such measures. Store these types of minerals in a similar way you would store arsenic or lead-bearing minerals: away from places with high amounts of traffic and away from places where children may get a hold of them. I store my collection of radioactive minerals alongside my whole collection of rocks and minerals either in a display case or in drawers. My storage area was well-ventilated even prior to collecting anything radioactive. I do not recommend storing radioactive minerals outside because of the thermal exchange they would be subject to. If the mineral is particularly friable (i.e., secondary uranium minerals such as autunite, tyuyamunite, or carnotite), I will store them in boxes with lids or bags to prevent the possibility of dust.
Conclusion
Collecting radioactive minerals is a niche hobby within the greater mineral collecting community and requires its own specific tools and practices. It is important to understand and appreciate the intrinsic characteristics which make these minerals unique. The process of learning about the minerals, researching the mines they come from, their geological settings, and actually collecting the minerals from the mine, is a very involved and rewarding journey. I am personally fascinated by the study of radioactive minerals and I have greatly enjoyed collecting them in the field.
This Article was first published in the YMC (Young Mineral Collectors) Newsletter in February 2024.